Showing posts with label Tutorial. Show all posts

Cara Menanam Sayur Buah di Polybag, Pot, dan Wadah Bekas

Sayuran organik selain ditanam (kebun), juga bisa ditanam dalam pot, polybag, atau wadah bekas lainnya. Karena tempatnya kecil dan lebih praktis dan bisa diletakkan di area sempit, sayuran ini bisa dikonsumsi sendiri atau dijual. Menjual sayuran organik seperti ini hanya bisa berupa sayuran atau tanaman dan pot atau polybag.

Menanam sayuran organik dalam pot atau polybag seperti tanaman cabai memiliki beberapa keunggulan, antara lain
  • Dapat dibudidayakan dalam skala kecil atau rumah tangga
  • Mudah dirawat karena setiap tanaman ditanam di wadahnya sendiri
  • Kemungkinan penularan penyakit melalui akar yang sangat kecil, tanaman yang sakit mudah ditanam
  • Hemat penggunaan pupuk karena tidak sia-sia
  • lebih mudah saat menanam beberapa jenis tanaman
  • tanah yang digunakan lebih sempit karena pot atau polybag dapat ditempatkan di rak yang ditumpuk
Meskipun ada banyak keuntungan menanam dalam pot dan poybag, metode lain memiliki beberapa kelemahan, termasuk:

1. membutuhkan biaya untuk menyediakan polybag dan pot
2. transportasi lebih lanjut
3. membutuhkan tempat penjualan yang luas jika Anda akan menjual sayuran dan wadah

A. Persiapan dan Media Lokasi
1. Pekebun dapat menggunakan polybag, pot, ember plastik, kaleng biskuit bekas dengan diameter 20-30 em dan tinggi sekitar 30 cm
2. Media tanam sayuran umumnya adalah campuran tanah dan pupuk kandang atau kompos
3. Perbandingan bisa 1: 1, 1: 2, 1: 3

Cara menanam Sayur di Polybag
B. Pembibitan
1. Ukuran biji kecil, seperti selda, sawi, cabai, dan tomat
2. Pembibitan dalam bentuk kotak kayu, polybag, pot, daun pisang atau wadah lainnya dengan diameter 10 cm dan wadah pembibitan yang tidak memiliki lubang.
3. Pembibitan dapat digunakan sebagai campuran tanah dan kompos dengan perbandingan 1: 3
4. Benih atau benih ditanam dalam wadah pembibitan yang telah diisi media tanam dengan jarak 1-3 cm
5. durasi persemaianya tergantung pada jenis tanaman misalnya 2-3 minggu untuk sawi

C. Penanaman
Untuk tanaman yang ditabur dulu
untuk tanaman yang tidak ditaburkan dalam pot atau polybag yang diisi dengan media tanam

D. Perawatan
  • Beberapa perawatan rutin yang perlu dilakukan sebagai berikut
  • setiap hari tanaman diperiksa tidak memiliki hama atau penyakit
  • jika masih terlihat subur, tanaman dapat dibuahi dengan pupuk sesekali atau kompos yang dimasak
  • Jika tanah terlihat kering, tanaman bisa disiram
  • Untuk tomat, cabai, terong, dan tanaman lain yang menghasilkan buah
Pola ini juga bisa digunakan untuk menanam buah, seperti menanam semangka.

Cara Daftar Adsense Cepat Approve

Cara Agar Adsense Cepat Approve - Mungkin 95% blogger pernah yang namanya daftar ADSENSE ya Saat ini di Indonesia sudah cukup banyak orang yang mendapatkan penghasilan ribuan dolar dari internet melalui program Google Adsense.

Menjalankan bisnis online Google Adsense memang bisa dibilang cukup mudah jika dibandingkan dengan model bisnis online lainnya.

Bisnis Google Adsense sangatlah unik karena pemilik akun Adsense akan mendapatkan komisi dolar berdasarkan jumlah klik yang diperoleh dari iklan Adsense yang dipasang pada blog nya, dan agar iklan Adsense diklik oleh pengunjung sangatlah mudah.

Karena kemudahan dan potensi yang besar ini, jumlah pengguna Adsense di Indonesia saat ini semakin banyak.


Akhir-akhir ini cara mendaftar Adsense sangatlah sulit, karena hanya website/blog yang berkualitas tinggi saja yang bisa diterima dalam program Adsense. Secara umum cara mendaftar Adsense adalah dengan langsung mengklik "Sign up" di website resminya www.Google.com/AdSense, lalu masukan alamat website/blog milik Anda yang akan didaftarkan, kemudian pilih bahasa situs Anda, dan isi kolom form informasi yang ada sesuai dengan data diri anda seperti nama lengkap, alamat lengkap, dan lain-lain. Namun cara ini sering kali membuat para pendaftar putus asa karena seringnya ditolak dengan alasan yang tidak jelas.

Berikut ini saya akan jelaskan beberapa hal yang harus diperhatikan sebelum mendaftar Adsense, agar kemungkinan diterimanya lebih besar.

Yang pertama yaitu bacalah peraturan Google Adsense dengan cermat agar mengetahui persyaratan apa saja yang dibutuhkan.

Yang kedua yaitu pastikan website/blog yang anda daftarkan memiliki kualitas baik dari segi desain, warna dan menu link navigasi. Google suka dengan web/blog yang terlihat profesional dan kontennya bermanfaat. Kemudian konten website/blog harus asli (original) dan bukan hasil copy paste dari situs lain. Google sangat suka dengan web/blog yang informative dan kaya dengan informasi.

Yang ketiga yaitu situs yang akan Anda daftarkan harus sudah memiliki trafik pengunjung yang cukup. Sebaiknya mendaftarkan web/blog yang sudah memiliki trafik pengunjung dan bukan blog baru yang belum pernah dikunjungi orang lain terutama dari mesin pencari. Jadi sebelum didaftarkann promosikan dulu situs Anda entah itu promosi melalui sosial media atau melalui search engine optimization.

Apakah jika situs saya telah memenuhi syarat-syarat diatas pasti diterima oleh Adsense? Jawabannya Belum Pasti!

Seperti yang telah saya katakan sebelumnya untuk diterima program Google Adsense sulit diprediksi, kadang kita sudah merasa yakin bahwa blog kita sudah bagus, tapi kadang tetap saja ditolak. Namun walaupun demikian tidak ada salahnya jika berusaha meningkatkan kualiatas situs agar kemungkinan diterima nya semakin tinggi.

Cara Daftar Adsense Melalui Blogger
  • Cara lain yang bisa dicoba yaitu mendaftar Adsense melalui Blogger.com, langkah pertama robahlah terlebih dahulu format bahasanya di setelan jadi english kingdom save lalu refresh 
  • lalu masuk ke penghasilan/earning 
  • Klik Daftar ikuti terus dan isi tahap-tahapnya sampai pengajuan tahap pertama selesai. 
  • Jika sudah selesai Review Tahap pertama buka-buka lah inbox gmailnya, karena info adsense biasanya masuk lewat email. 
  • Selanjutnya tinggal menunggu Review tahap ke-2, jika di Acc Selamat anda bergabung sebagai Publisher Adsense
Daftar Adsense lewat blogger.com palig tepat dan mudah karena ini merupakan layanan free blog milik google dan merupakan situs yang disupport sebagai hosted partner site atau 3rd party site (situs partner).

Itulah artikel mengenai cara mendaftar Adsense yang bisa saya bagikan, selamat mencoba dan semoga berhasil.
-------------------------------------------------------------------------------------------------------
Tips Tambahan:
Agar tidak ditolak dan mudah diterima oleh Google Adsense, cobalah daftar dengan menggunakan domain berbayar seperti .com atau .net. Kemudian buat blog dengan konten yang bermanfaat dan promosikan agar bisa dapat banyak trafik pengunjung blog.

10 Tips Saat Ujian

Saat Anda melakukan ujian, Anda menunjukkan kemampuan Anda untuk memahami materi pelajaran, atau dalam melakukan tugas tertentu. Jika Anda ragu tentang kejujuran ujian, atau kredibilitas tes untuk kemampuan Anda, ketemulah atasan Anda.

Ujian memberikan dasar penilaian dan penilaian terhadap kemajuan belajar Anda. Ada beberapa kondisi lingkungan, termasuk sikap dan kondisi Anda sendiri, yang mempengaruhi Anda dalam melakukan ujian.

10 Tips Saat Ujian :

*Datanglah dengan persiapan hati-hati dan sebelumnya.
Bawa semua alat tulis yang Anda butuhkan, seperti pensil, pulpen, kalkulator, kamus, jam tangan, penghapus, bekas tip, penggaris, dan sebagainya. Peralatan ini akan membantu Anda menjaga konsentrasi saat melakukan ujian.

*Tenang dan percaya diri.
Ingatkan diri Anda bahwa Anda siap dan akan melakukan ujian dengan baik.

* Jadilah mengamuk tapi waspada.
Pilih kursi atau tempat yang nyaman untuk melakukan ujian. Pastikan Anda memiliki cukup ruang untuk melakukannya. Pertahankan posisi duduk tegak.

*Pratinjau pertanyaan tes Anda terlebih dahulu (jika ujian memiliki waktu tak terbatas)
Luangkan 10% waktu ujian untuk membaca soal ujian, tandai kata kunci dan putuskan berapa lama waktu yang dibutuhkan untuk menjawab setiap pertanyaan. Rencanakan untuk melakukan hal yang mudah terlebih dahulu, hanya masalah yang paling sulit. Saat Anda membaca pertanyaan, catat gagasan yang muncul yang akan digunakan sebagai jawaban.


*Jawaban tentang pertanyaan strategis.
Mulailah dengan menjawab pertanyaan mudah yang Anda tahu, lalu dengan pertanyaan yang memiliki nilai tertinggi. Pertanyaan terakhir yang Anda lakukan adalah:

o pertanyaan yang paling sulit
o yang membutuhkan waktu lama untuk menuliskan jawabannya
o memiliki nilai
*Saat mengerjakan beberapa pertanyaan pilihan, tahu jawaban yang akan dipilih / tebak.
Start-start, abaikan jawaban yang anda tahu salah Tebak selalu jawaban bila tidak ada pilihannya, atau jika tidak ada pilihan jawaban yang bisa anda abaikan. Jangan menebak jawaban saat Anda tidak yakin dan kapan. Karena pilihan pertama jawaban Anda biasanya benar, jangan ubah kecuali Anda yakin Anda akan melakukannya.

*Saat melakukan ujian esai terlebih dahulu, sebelum menulis.
Buat contoh jawaban singkat untuk sebuah esai dengan beberapa catatan gagasan yang ingin Anda tulis. Kemudian tentukan ide tersebut untuk mengbles dimana anda membahasnya terlebih dahulu.
*Saat melakukan soal ujian esai, jawablah pokok-pokok permasalahannya secara langsung.
Tulis kalimat dasar Anda di kalimat pertama. Gunakan paragraf pertama sebagai ikhtisar esai Anda. Gunakan paragraf berikutnya untuk membahas pokok-pokok permasalahan secara rinci. Dukung poin Anda dengan informasi, contoh, atau kutipan spesifik dari bacaan atau catatan Anda.
*Sisihkan 10% waktu Anda untuk meninjau kembali jawaban Anda.
Cek jawaban Anda; hindari keinginan untuk segera tergesa-gesa saat menjawab semua soal ujian. Periksa lagi karena Anda telah menyelesaikan semua pertanyaan. Baca kembali jawaban Anda untuk pengecekan ejaan, struktur bahasa dan tanda baca. Untuk jawaban matematis, jika ada kecerobohan (misal salah sales decimal). Jawaban untuk jawaban matematis Anda yang sebenarnya dengan hitungan singkat.

*Analisis hasil ujian Anda
Setiap ujian dapat membantu Anda mempersiapkan ujian berikutnya. Tentukan strategi yang cocok untuk anda. Tentukan strategi mana yang tidak bekerja dan ubah mereka. Gunakan kertas ujian sebelumnya saat belajar untuk ujian akhir.

Cara Monetize Dollar Youtube Berubah Dari Kuning menjadi Hijau

Cara Monetize Berubah Dari Kuning menjadi Hijau
Cara Monetize Dollar Youtube Berubah Dari Kuning menjadi Hijau

Youtube memiliki system yang ketat dan canggih, maka dari itu kita memakai cara apapu juga susah, namun inget ya "No system is Safe" jadi gak ada salahnya kita coba-coba berbagai cara.
Cara nya sangat mudah. Baru-baru ini youtube membuat aturan baru terkait video yang di upload para youtubers. Pasti kalian kebingungan terutama kalian yang wajah-wajah dollar wkwkwk.
Awalnya saya juga bingung kenapa monitize dollar yanh awalnya warna hijau berubah jadi kuning, setelah saya membaca aturan baru youtube tersebut dan mengikuti pentunjuk. Hmm... jika mengikuti petunjuk saya merasa untuk mendapatkan dollar akan lebih lama.
Saya tidak menyerah karena aturan tersebut aturan manusia jadi prinsip saya "No system is safe". Dengan keyakinan prinsip tersebut saya langsung bereksperimen, bermacam-macam cara di coba, awalnya sering gagal karena namanya aja eksperimen, cara ini gagal ya pakek cara lain yg belum di coba atau di padukan cara pertama dengan cara lain.
Lumayan menghabiskan waktu banyak dalam eksperimen dan resikonya sangat tinggi, bisa-bisa anda di suspend tapi tenang saja jika anda youtubers sejati pasti tahulah aturan main youtube terkait suspend atau banned. Jarang sekali bahkan banyak yang menyerah karena aturan youtube sejak april kemaren tentang review 10k untuk dapat di monetize. Saya juga hampir menyerah karena banyak channel yang di tolak dan di banned permanent.

Cara Monetize Dollar Youtube Berubah Dari Kuning menjadi Hijau
Aturan semakin gila, youtubers juga semakin gila, mastah juga gila wkwkkw.
Okelah saat ini saya akan bahas
Cara Monitize Berubah Dari Kuning menjadi Hijau. Belum di share saja sudah kuning, hahaha di masih di jadwal maksud saya, itu berarti tim youtube memeriksa video sebelum di share. Jadi mohon di maklumi.

Sebelum membaca cara ini, kalian baca dulu dari atas ya.
Cara Monetize Dollar Youtube Berubah Dari Kuning menjadi Hijau
Cara Cuy :
- ganti judul konten video anda, jika gagal ganti lagi. Ingat ya jangan cepat-cepat atau keburu ganti judul, harus di ukur jaraknya. Ganti judul tunggu sampai 3 jam lebih, jika masih gagal ganti judul lagi, jika masih gagal ganti judul lagi dan monitize di off kan dulu, tunggu 3 jam lebih setelah itu on kan lagi. Jika masih gagal biarin dulu mungkin masih di tinjau. Punya saya pakai cara ini 2 jam kembali hijau, untuk ganti judul entah berapa kali wkwkwk.

- ganti thumbanail yang menarik tapi bukan click bait ya, cara ini sangat jitu mancing pengunjung. Karena rata2 orang indonesia menyukai judul dan thumbnail menarik agar klik konten anda, walaupun isi videonya tidak berkualitas.

- upload video berkualitas HD atau 720 keatas ya. Durasi terserah anda, kalau bisa minimal 1 menit.

- Jika masih gagal padukan cara-cara di atas tetapi ingat jangan melanggar aturan main youtube, bisa di suspend lho.

- Pasrah dan berdoa.

itulah cara-cara yang saya buat sendiri selama ini. Sudah puluhan video pakai cara tersebut aman. Bagi yang tetap kuning ya pasrah saja nunggu 1000view hahahaha.

Cara Monetize Dollar Youtube Berubah Dari Kuning menjadi Hijau
Cara Monetize Berubah Dari Kuning menjadi Hijau

Makalah dan Skripsi http://freeblogpanen.blogspot.com

Cara transfer Dari Paypal ke Bank Lokal Update Terbaru 2017

Dalam dunia internet tidak luput dengan namanya paypal apalagi di bidang belanja online. 
Saya punya lumayan banyak saldo di rekening paypal? Tapi saya bingung gimana caranya menarikn ke bank lokal ya? takut salah cara nanti di banned paypal saya,.

Cara transfer Dari Paypal ke Bank Lokal Update Terbaru 2019
Tenang mas bro, karena saya akan memberikan cara menarik saldo paypal ke seluruh bank lokal, saya bahas dalam artikel ini ya.

sudah tau apa itu paypal?
Paypal itu rekening online biasanya dan yang paling sering digunakan untuk alat pembayaran dalam berbisnis online. Selain nyaman dan aman, fee yang dikenakan saat menerima pembayaran juga rendah.

Makanya banyak orang yangmenggunakan pembayaran melalui paypal, namun bagi yang awam seperti saya ya kesulitan juga hahaha tidak aman dan tidak nyaman.

Mending minum dulu daah


Apply 8 Ways to Be the Best Man According to Islam

you are Moslem? Apply 8 Ways to Be the Best Man According to Islam

1
Meet the five pillars of Islam. Five Pillars of Islam are needed for all Muslims. You must obey them to practice Islam. Being a strong Muslim, do not waver from your obedience to the pillars. Fulfill your daily obligations with care, and plan your occasional duties carefully. The Five Pillars are:
Testimony of Faith (Shahada). When you become a Muslim, you make a testimony of faith. Say aloud: "There is no god but Allah, and Muhammad is his messenger."
A five-day prayer performance (Salah). Pray five times a day in the direction of the holy city of Mecca.
Fasting in Ramadan (Sawm). Ramadan is the holy month. Observe by praying, fasting, and doing charity.
Donate Contribute 2.5% of your savings to the poor (zakat).
Make a pilgrimage to Mecca (Hajj). If you can afford it, you must go to Mecca at least once in your lifetime.

2
Read the scriptures Read the Qur'an as often as possible. Seek understanding of Islam directly from its source. You will strengthen your personal beliefs if you know the language on which your faith is based. Make reading exercises for a few minutes each day, and also times when you feel your faith is shaky or your focus on God is shaky. [1]
Every time you read, read at least one verse aloud.

3
Pray above and beyond the requirements. While you have to pray five times a day, a strong Muslim can also pray in extra time when he is moved to do so. You may pray for yourself, but to strengthen your faith, go to your mosque at prayer time. Collective worship has special advantages. [2]
While the prayer should last at least five minutes, you can extend your time to prayer.
Vary your routine so that you feel conscious of the act of prayer, and not just through motions.

4
Donate time and money to the needy. While alms are required of all Muslims, it is up to individuals to determine what they can provide over 2.5% of their income. If you are a high earner, donate more than 2.5% of your income to good ends represented by a credible organization. If you have extra time, volunteer at a charitable organization. If you have specific skills that can help others, such as training or TESOL knowledge about the law, consider donating your expertise to non-profit organizations and volunteers who are unable to hire professionals. [3]

5
Contributing to the fulfillment of people's need for fard al-kifaya. Fard al-kifaya is a public obligation. Some of your communities must meet the fard al-kifaya for the rest of the world. For example, if a Muslim dies, some Muslims in the community must gather to say a funeral prayer. There is no need for any Muslim to say a prayer. However, if nobody says a funeral prayer, the whole society is wrong. [4]
Go forward to fill the void when your community fails to meet the al-kifaya fard.
Think bigger meaning of fard al-kifaya for your community. Could the Muslims in your community take responsibility for feeding the hungry, improving civilian infrastructure, or participating in local politics?

Stand for yourself and other Muslims. Muslims are often portrayed negatively by various political groups to achieve their own goals. You do not have to be involved whenever you hear the statement of Islamophobia, but you have to say something if you feel safe and have the energy to do it. [5]
If you hear someone confuse Islam with violent extremism, you might say, "I am a Muslim, and I do not respect you with the assumption that all Muslims forgive violence, it is not based on facts, and say it as if it can be dangerous. me and the person I love. "
Stand for other Muslims if you see them being targeted. For example, if you see a veiled woman being harassed, stand between her and her harasser and invite her to talk to release her from the person who is harassing her.
2
Dress to express your faith Most Muslims dress modestly, but the style of dress varies greatly according to the school of thought and region. Consider your circumstances and clothing in a way that expresses your religious beliefs. [6]
Even if your family is not dressed like this, you can choose to wear a long-sleeved shirt or headscarf to more clearly express your identity.
If you do not use easily recognizable Islamic symbols, consider using a button or using bumper stickers with pro-Islamic messages.
Take care of yourself. If you live in a place where you have a physical risk to show (or fail to show) your faith, make the compromise you need to keep it safe.

3
Join or start affinity groups. Consider joining youth groups, collective volunteers, or group meetings for other Muslims. Check your mosque to see if there are any groups you can follow. If you go to school, there are often affinity groups for Muslim students, or interfaith groups that are followed by other Muslim students.
Watch the holidays together, go to meetings, and organize demonstrations, celebrations, and other events in your community.
Establish writing committee letters to contact your local politician about laws that will affect other Muslims, such as refugees from Muslim-majority countries.

How To Change Image On Logon, Logoff Or Lock Screen In Windows 2018

As we know Windows 7 is OS number 1 which is widely used by PC / Laptop users as its OS. Because Windows 7 OS is a simple appearance and a variety of application support programs for Windows 7 this. Anyway Windows 7 is User Friendly.

Hence this OS deserve to be called as OS a million people. But unfortunately now Windows 7 stopped in the middle of the road (no update it anymore) because Windows focus on the latest OS output, which is Windows 10 which he said Final OS. This means that windows 10 is the OS of Windows as an ending of other OSs, and will not be the next Windows.

It's just for the newest output there will be updates in Continue update. How To Change Image On Logon, Logoff Or Lock Screen In Windows 2018

Therefore if you feel bored with the look of Windows 7 that's it while you are still hard to use this OS. Nothing wrong you read the tutorial below carefully for the changes you make can be applied properly. Due to replace Logon, Logoff or Lock screen is indeed a bit complicated and needed precision at every step.


There is an easier way to replace Logon, Logoff or Lock this screen, which is using Windows 7 logon background changer software. How it works the same ie editing on the regedit but automatically (short). The feared if using this software is a virus that carried or deliberately disispi virus in the application. Sehinggal if I suggest mending manual only, do not use software that origin.

Here are the steps you should take. Follow step by step carefully, do not get it wrong. If there is a mistake at all then the image you apply will not appear. Notice the steps as follows:


Sebelum (Default)

1. Buka Windows Start Menu lalu ketikkan regedit, Atau bisa menggunakan WinKey+R lalu ketik regedit.


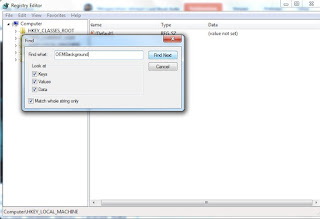
2. If the regedit program is already open then the next step is right click on HKEY_LOCAL_MACHINE folder, then select find. Enter OEMBackground then click find next. Wait until the registry is found, if not then you must create the registry first. 

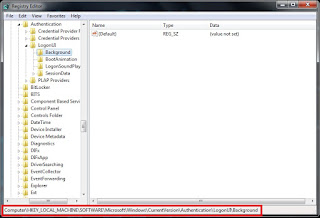
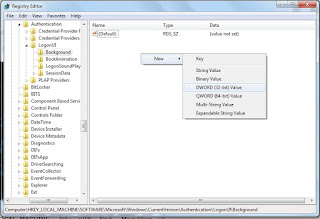
The trick is to open HKEY_LOCAL_MACHINE / SOFTWARE / Microsoft / Windows / Current Version / Authentication / LogonUI / Background like in the picture marked with red box. If it is then right click on an empty area select New and then select DWORD (32 bit) Value, then name OEMBackground at the value you created earlier. If you have double click on OEMBackground then fill the value that was 0 to 1. Then close regedit it. How To Change Image On Logon, Logoff Or Lock Screen In Windows 2018


Klik kanan pada HKEY_LOCAL_MACHINE lalu pilih Find


Masukkan OEMBackground lalu klik find next


Buka folder satu persatu sesuai dengan direktori yang ditandai dengan warna merah


Buat value baru dengan nama OEMBackground ganti valuenya menjadi 1

3. Saya rasa untuk registry sudah selesai, maka langkah selanjutnya adalah buka Windows Explorer lalu pergi ke C:\Windows\System32\oobe seperti pada gambar dibawah ini.


4. Buat folder dengan nama info lalu dalam folder info buat lagi folder dengan nama backgrounds.


Buat folder dengan nama info


Buat lagi folder dengan nama backgrounds di dalam folder info

5. Pilih gambar yang anda inginkan sebagai gambar pada logon screen. Usahakan gambar yang sesuai dengan ukuran layar desktop atau monitor. Pastikan gambar berformat .jpg dengan size gambar tidak melebihi dari 245KB.


Pastikan gambar berformat .jpg dengan size gambar tidak melebihi dari 245KB

6. If you have found a suitable image and liked then copy and paste the image in the backgrounds folder as in step number 4 that you have created. Rename the image you copied earlier with the name BackgroundDefault. then close windows explorernya.


Beri nama BackgroundDefault pada gambar yang anda copy paste ke dalam folder backgrounds

7. Masuk ke lock screen dengan menekan Winkey+L atau ke menu windows lalu Lock. Dan lihat hasilnya, jika gambar yang anda pilih muncul pada lock screen berarti langkah-langkah yang anda lakukan berhasil sempurna. How To Change Image On Logon, Logoff Or Lock Screen In Windows 2018


Kunci komputer anda dengan menekan Winkey+L pada keyboard atau masuk Windows lalu Lock

Sampai disini dulu pembahasan saya kali ini mengenai artikel Cara Merubah Gambar Pada Logon, Logoff Atau Lock Screen Pada Windows 7. Semoga bermanfaat bagi anda dan bisa memberikan kesan berarti bagi anda. Ikuti terus perkembangan mengenai info menarik mengenai PC dan android hanya di blog ini.


Sesudah diganti dengan gambar yang kita inginkan

Bagi yang kurang faham pada langkah-langkah yang saya berikan. Berikut saya sediakan video tutorialnya untuk anda :


Note: Click the follow button on our blog to get updates about info that can help you and provide insight for you. Do not forget to share my post and video tutorial if interesting and can help you. Comment on it well and give criticism and suggestions if this post is not detailed, there are points that missed broken links or unpleasant content. That is all and thank you. How To Change Image On Logon, Logoff Or Lock Screen In Windows 2018

K-Lite Mega Codec Pack 19.2.5. Final


K-Lite Mega Codec Pack Terbaru - For those of you who often watch Movie or Video ever occasionally or often experience the constraint of the video format you use is not read by the video player so you are confused what to do? Do not be afraid of friends, we here have the right solution for you.

Is a K-Lite Mega Codec Pack that can allow all the various video formats you have will be read by the video player you use. K Lite Mega Codec Pack is a collection of Codecs that support various formats of all video types (mkv, flv, mp4, 3gp, avi, wav etc.). The Codec or Compressor-Decompressor functions as encoding and decoding to play different types of video and audio.

So if we install this codec pack. Then you can enjoy the unread video earlier using either Windows Media Player or Media Player Classic (already in the pack instal). The point is this Codec Pack allows you to play video or audio throughout the media player without having to worry again will format the file that does not support.

Just enough of this short article about update K-Lite Mega Codec Pack. Hope can help all your problems. For those who do not know how to install, simply check all audio formats for audio and video formats for video. And then you can. That is all and thank you.

Note: Do not forget to leave a comment if this post is interesting and useful, we also accept criticism and suggestions that help for the convenience of this blog content. Do not forget also "like" or I am very grateful your jita "share" my blog is on the Facebook fan page.

How to Reset / Restore 1 Minutes End

How to Reset / Restore Advan Vandroid T1G to Factory Settings - Again play the game, while waiting for my internet cafe my sister brought T1G Plus advocate Tablet error system, application position can not be done anymore, just appear in menu but error, I immediately open the lid hp him, unplug all the sim card and external memory, so in anticipation of data people do not get lost.

Basically to reset the android or tablet is almost the same, there are still differences dikit2, but if it is often entered into the factory mode with different brands and types of android / tablet the differences may not be confusing, but yes if still confused do not worry, just ask to mbah google yes, do not ask on the grass that sway :) Ok immediately wrote to main focus How to Reset / Restore Advan Vandroid T1G to Factory Settings.

How to login Recovery Advan Vandroid T1G Plus
Prepare before enter Recovery Advan T1G Plus, make sure the battery is sufficient and Unplug the Sim Card and Memory is still installed.

To navigate in recovery mode Advan T1G Plus to select the options available in recovery mode Advan T1G Plus use volume buttons while to confirm or ok use power button. How to Reset / Restore 1 Minutes End

Reset Advan Vandroid T1G Plus can delete stored user data, Applications and Games installed on Advan Vandroid T1G Plus, and below how to reset Advan Vandroid T1G Plus which error application and forget the screen lock pattern.


Cara Reset/Mengembalikan Advan Vandroid T1G ke Setelan Pabrik


How to Reset Factory Settings Advan Vandroid T1G Plus.


Turn off Advan T1G Plus

Sign in to Android system recovery Advan T1G Plus by press and hold Volume Down + Power button simultaneously until advan logo appears, Release power button, Down volume button keep pressed until logo appears android No command, then press volume button to continue to Android system recovery Advan T1G Plus.

To navigate in recovery mode Advan T1G Plus to select the options available in recovery mode Advan T1G Plus use volume buttons while to confirm or ok use power button.

wipe data / factory reset

Yess - delete all user data

reboot the system now

How to Reset / Restore 1 Minutes End

Alhamdulillah Taban Advan Vandroid T1G Plus that brought my sister had recovered as usual when just bought.

So how to reset Advan Vandroid T1G Plus is slow, application error and forget pattern.

How to Reset / Restore 1 Minutes End

Hopefully how to reset / Restore Advan Vandroid T1G to Factory Settings can be useful for those who need it.

How to Reset Hard Oppo R821 | Factory Oppo R821 Setting

Yesterday, exactly Malem Saturday 02 July 2016, I asked for help to flash Hp Android Oppo R821, yes already hp I received but I do not check first condition hpnya kayak gimana, I immediately wrote stock rom Oppo R821 and driver.

After all the combat equipment is available, I just turn on his opp R821 hp, then I keep running while in open-open all the apps, in my mind it does not need to flash, because the obstacle is just a little bit slow and there are some little error in the application . How to Reset Hard Oppo R821 | Factory Oppo R821 Setting


I decide this Hp Oppo R821 will not me Flash use stock rom, I try to restore the settings to factory settings with hard reset. Oppo Find Muse R821 is a way to restore Oppo Find Muse R821 to factory settings, this way is useful to overcome various software problems in Oppo Find Muse R821. How to Reset Hard Oppo R821 | Factory Oppo R821 Setting


Hard Reset can also recover some problems that can be resolved by hard reset include Restore key pattern or security code Oppo Find Muse R821, Restore settings and data Oppo Find Muse R821 to factory settings. To overcome Oppo Find Muse R821 botloop after installing apps, etc.


Cara-Hard-Reset-Oppo-R821
Create your Oppo Find Muse R821 users who experience various software problems as above, It's good you do a hard reset to restore the Oppo Find Muse R821 before deciding to flash or Ugrade OS Oppo Find Muse R821 with new firmware.

Proven After my Hard Reset Hp My friend Oppo R821 fully recovered back to the factory initial setting, immediately wrote my thanks Thank God Alhamdulillah .... He ....


Here's How to Do Hard Reset Oppo R821, Please follow the steps,

Hard Reset Oppo Find Muse R821

Turn off Oppo Find Muse R821

Go to Recovery mode Oppo Find Muse R821 by press and hold Volume Down + Power button simultaneously until at the bottom left corner of the screen pops up text = & gt; Recovery mode and release both volume and power buttons, Wait a few moments Oppo Find Muse R821 will go into recovery mode menu.
For navigation use the volume buttons, For confirmation use the power button.
Select wipe data / factory reset
Confirm select Yes - delete all user data
Select wipe cache partition
Choose reboot system now
If you managed to do a hard reset Oppo Find Muse R821 in the recovery mode menu, Now Oppo Find Muse R821 You must be in a state like new from the factory.
For those who successfully follow the steps of Hard Reset Oppo R821 I say Congrats, Glad to help he ... How to Reset Hard Oppo R821 | Factory Oppo R821 Setting

But If after doing a hard reset you still find the same software problems in Oppo Find Muse R821, We recommend upgrading OS Oppo Find Muse R821 with new OS.

May be useful. How to Reset Hard Oppo R821 | Factory Oppo R821 Setting

How to Fix Battery / Blackberry Battery Sign Red Cross

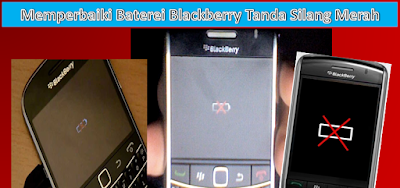
How to Fix Battery / Battery Blackberry Cross sign - Continuous Light is a personal experience is quite thrilling, while I was nyantei at home, I arrived her sister brought a hp blackberry bold 9650, he said it was his friend's friend asked for flash, indeed my previous often ngeflash hp from friends and friends he friend ... but not for commercial, just likes aja help and itung2 add knowledge experience, this is indeed known by younger brother, so that sister asked me to ngeflash hp bb temannya it.

memperbaiki-baterei-blackberry-tanda-silang-merah
Without any direct pleasantries I received, then I search first firmwarenya fit and fit, after I can directly flash pake BBSAK, flashing running normally and smoothly, the next day hp taken younger brother to be given again with his friend, 2 days later hp dianterin again to me, bbmnya error, after the bbm I fix, batteries bb is dying immediately wrote hp dead, then I cas / charge hp bb and I leave to go for other purposes, after returning to my home check bb turns out the battery is not ngecas and there cross mark in the middle, wah .. wah .. well ... I have tried to pull the battery pairs again still remain a red cross, waduh gimana this, the time must change hp people, make pay motor deposit aja nunggak 2 months he ....

Then I decided to meditate, begging ilapat from Mbah Google he ... After can hint his way, then I play as a result Alhamdulillah hp bb also recovered from Colapse batere sign of cross, Indeed One of the terrible problems for BlackBerry users is the problem of the battery can not charge power on charge and just display the battery error logo with a red cross (X) on the screen. And from the consequences of the problem, if the battery power has been exhausted then the result of hp BB also can not be turned on.

And if things like the above happen, then it's a sign that your BB phone has got a problem called red cross because it failed to recognize the battery. Actually this kind of thing happens for some reason for example, you often use and let hp until the battery is completely empty or because the use of charger abal-abal.

To overcome this case, there are several steps that can be applied, well that's itung-itung who knows only BB battery can still be used before you intend to replace it.
Here's How I get in overcoming hp blackberry betere red cross

First Way - Fixed Battery Error Red Cross Signs:
For this first way, you are required to menyiampakan one PC / Laptop first, then if you can do not forget to install also BlackBerry Desktop Manager application
In case BB condition is off (dead) Remove (unplug) the battery.
Run the Desktop Manager app on your PC / Laptop.
Connect your mobile phone to your PC / Laptop using the USB cable.
Let BB be charged for a while without battery (at least 5 minutes).
In the still state of the charge, plug the battery back and wait until BB turns on its own (if it does not turn just push the power button),
Let stand a few minutes longer until the battery is filled around some bars.
After the battery is filled with several bars, restart BB.
When the process of restarting, immediately unplug the connected USB connection on PC / Laptop.
After the BB is seen normal again, please fill the full battery normally using wall charger (cargenya not use USB connection to PC again yah).
Second Way - Fixed Battery Error Red Cross Signs:
If the above method still fails, try to do the second way with the following steps.
With the battery still installed and in the off position, please plug the BB into the wall charger (not USB to PC).
Allow for about 1-2 hours.
In case the wall charger is still plugged in, unplug the battery.
Let stand for about 15 minutes.
Replace the battery.
Next let the charge until the battery is fully charged.
Probably until here the reviews share experience how to cope with and fix the batteries bb cross, and should the BlackBerry battery error show cross (X) red when the charge (cas) can be overcome as the experience I experienced, if not successful there is a possibility klo not batteries socket batteries dirty / damaged.

Thank you, Hopefully Helpful

Building Child Character Early on


As we know the child at the age of 0 to 5 years is a time where the child is easier for us to learn or we set. Because at this time is a period in which the child is showing his ego. The child is a reflection of his parents. If we are bad then the child will automatically be just as bad as us. Conversely, if we are good parents then anakpun will also participate well. So from that either as bad as any we as parents would want the best for his son, in the sense of not to be as bad as us.

If likened to a child is a canvas then we are the painter. If we draw on the canvas with beautiful scribbles, then the impression we and others will see is something beautiful. But on the contrary, if we are carelessly painted or irregular, the result will be disappointing (bad) either in our eyes or in the eyes of others. Therefore it is good we as parents to guide their children to be a useful person and give a good impression for the people around him. Building Child Character Early on

Here are some tips to guide your child to be what we want:

1. Give a good example

In this method we give good behavior to the child to be imitated for him. Therefore we should exemplify which behavior is right for the child and which should not be shown to the child. As an example if we eat while standing should we improve the trait by replacing it to sit while, if the child has a habit of often lapping people then we educate and give him an example by stroking him or others around us. This is far more effective than if the child made a mistake and then we snapped at him. Because the name of the child in this period is very easy to imitate about the surrounding circumstances.

2. Whisper him while he sleeps

Sleep is the time when the information window can be received unconsciously. Because at that time the brain is in the subconscious, allowing us to describe the right material for the child to apply later. Actually this method is almost the same as hypnotic methods that utilize our subconscious, and what we know hypnosis is where a suggestion that we give to people we hypnotize it to obey what we sugestikan earlier. But the difference with the hypnotic method is if the method at this time of sleep is we do not force the child to obey what we ordered. But we give an attitude to the child to choose what is good and what is not good for him. It is endeavored in this method that we whisper these things when the child is in a semi-conscious condition, the intent here is when the child is not in a deep sleep but at the time after the child is delirious.


3. Singing soft music

Music is a series of notes that provide an imagination that implies the listener to describe what is implied by the tones. Therefore we as parents must often provide a stimulus to the child through a soft song. Do not let us as parents who love music loudly apply or play songs or tones. Because according to the study concluded that a plant will be much faster to develop with soft music rebound rather than the plants that sung loud music. The group of bees that are on the tube played soft music will create a beautiful dance and order by a group of bees. Another case with loud music makes the bees fly irregularly as in a state of threat. Well, what if we apply to children? How much more wisely we as parents to chant soft-paced music like classical pop songs and instrument songs so that the child's temperament will be gentle and polite.

4. Throw away the word "do not"

Why at this point we are not allowed to say the word "do not" to the child? Do you know as a parent who was once a child, do you often listen to the word "do not" is? So what response do you receive when you listen to the word? the word "do" is a word where an action is not to be done. In children if often hear the word will give a big question mark on his mind. The more often we give him the word it will be more and more questions are stored in him which later he will do it in the future. Well, it would be nice we replace the word "do not" with a word of invitation to not do things that are not good for children. For example if the child is often snacking then our attitude as a parent gives an explanation like this: "Son, if you continue to eat later your stomach hurts, mending eat just let his stomach full". In this case the child will better know the consequences that will be obtained compared with us forbade him not to snack. The conclusion is to avoid as little as possible the word "do not" is an inviting word that culminates in the consequences that he or she can get if he does.

5. Try not to yell at the child

At the age of toddlers the child will be very sensitive to what he receives whether it is a word, a treatment or a shout. This will result in the child's mental decline. According to the study mentioned that once the children yelled resulted in millions of brain cells die directly. Well, if the brain cells are dead then automatically the intelligence of children will also come down. We recommend that our attitude as parents not to yell at him.

As a solution is to address a naughty child should we take a personal approach to our children. Give him a good explanation that what he did was not good for him. If the child is too naughty to cause us anger, the solution is to have the child facing the corner of the wall until our child realizes his mistake and apologizes.

6. Approach through potential

The point of this point is where we should know the potential or the passion of the child so that we are easy to approach and provide useful advice for the child. With this method we call it by learning by doing method. Because through this method we closer ourselves to the child using the penchant for children. For example if we already know the potential of the child is playing ball, then we use this interaction while playing ball. We teach how to play the ball and while we provide an approach to provide various kinds of guidance that is constructive for children such as children should be diligent, not to always angry, must be more active learning, jagan never give up or others.


7. Avoid children from gatget, mobile and others

In today's it is difficult for children not to know what technology is. But it would be better if the child to not know first what technology will be. Because the name of the child always wants to play, while existing on the phone or gadget we have a variety of games. This creates an opiate for the child so it causes the child away to play with his peers, we call this the nature of autism in children. It is very unfortunate when our children will grow up but will not want to interact with the social. In addition, if children continue to use these devices resulting in impaired concentration of children, because the concentration of children is always fixed on the existing game on the device. And the eyes will be more quickly disturbed in children, because the physical child who is still small will be too old on damage. Allow the child not to know what technology is. Because later on he will be a teenager, he will be on his own to find out what technology is.


So can I say, although a little explanation from me may be useful for you to be able to address what to do with our children. Because we as parents certainly want the best for their children. Good bad child is the result we get later. Therefore we should educate it to become more baih so it is our name as a parent.


NB: Do not forget to leave a comment if this post is interesting and useful, we also accept criticism and suggestions that help for the convenience of this blog content.

Cara Daftar Akun Google Adsense lewat Youtube cepat diterima

Cara Daftar Akun Google Adsense lewat Youtube cepat diterima

Cara Mendaftar Akun Google Adsense lewat Youtube cepat diterima-Mendaftar adsense bukanlah hal yang begitu sulit untuk pemula seperti kita, mendaftarkan Blog ke Adsense merupakan pengalaman tersendiri bagi kita, jika gagal jangan pernah mencoba untuk menyerah, namun tetap berjuang keras. Persaingan di Internet semakin tinggi, dimana Setiap blogger harus mempunyai kemampuan dan keterampilan tersendiri. Google Adsense misalnya, saya sudah mencoba berbagai cara mendaftarkan blog saya yang satunya yaitu Infoblogku namun belum juga diterima oleh Google Adsense. Banyak sekali peraturan yang harus dipenuhi dan saya merasa bingung dengan Peraturan yang belum bisa di bilang spesifik salahnya dimana.

Google Adsense memberikan Godaan yang besar untuk saya, hehe, dimana setiap publisher adsense merasakan manfaat dan nikmatnya hidup uang yang tiap bulan mengalir seperti air, itulah yang membuat saya semakin bersemangat mengelola Blog untuk dunia Internet. sudah sering saya mencoba mendaftarkan Blog saya, namun alhasil masih NOL, Namun setelah saya mencoba mendaftarkan lewat Akun Youtube dan rupanya tidak sia-sia.

Mendaftar Google Adsense Lewat Youtube memang sangat mudah dan gampang, dimana kita cuma menunggu beberapa jam saja persetujuan sudah di aprove oleh Google adsense, dari situ saya mulai upload video-video buatan saya, misal video tutorial unik yang orisinil bukan plagiat dari video orang lain, waktu itu saya upload 3-4 video orisinil yang sengaja saya buat untuk mendaftarkan adsense, jika anda berniat untuk mendaftar Google Adsense, namun masih ragu karena Blog anda masih baru atau belum sesuai dengan kriteria jangan kawatir, anda tetap bisa melakukannya kok.

Berikut ini saya akan menjelaskan bagaimana cara daftar Googler Adsense dengan Youtube, Pertama yang harus anda lakukan yaitu harus mempunyai akun Google setidaknya berumur 1 bulanan, dan umur anda sudah 18 tahun keatas, jika masih 17 tahun,, ubah saja umur yang ada di google Plus anda/ akun Google anda. Setelah itu mari kita lanjutkan.

Apa sih yang di harapkan Google adsense dari Youtube ?

1.Konten Video Yang Orisinil
Nah sudah pasti konten video anda harus orisinil dan menarik, Dengan begitu Google Adssense akan melakukan Rewiew terlebih dahulu terhadap Video yang anda upload ke Youtube, dan menilai apakah video tersebut merupakan copy paste video orang lain atau tidak, nah maka dari itu anda harus memiliki atau membuat Video yang orisinil dan menarik.

2.Konten Video Yang Unik
Konten Video yang unik sangat disenangi oleh Google, dimana Video yang unik dan Konyol akan menghasilkan Viewer yang membludak, percaya gak percaya silahkan coba, dan cari video yang unik di Google, pasti viewernya banyak sekali sampai jutaan, Gunakan kesempatan itu untuk menarik perhatian Paman Adsense ini, Namun jangan video yang mengandung unsur porno ya. Dan semoga berhasil.

3. Konten Video Persaingan
Maksud dari kata persaingan ini adalah buatlah Video yang bertemakan persaingan, misalnya tentang Gadget SAMSUNG vs NOKIA, nah buat tutorial Video yang memberikan Spesifikasi antara kedua Handphone tersebut, mulai dari Performa, Grafik, Kamera, Desaign, dan lain-lainnya. Sementara itu anda juga harus ahli kalau membuat video persaingan ini,karena jika tidak akan bikin malu aja,hehe. :)

Bagaimana Cara daftar Adsense dengan Youtube ?
Nah Selanjutnya yaitu cara mendaftar Adsense dengan Youtubenya.

  1. Siapkan Video anda Dulu sekita 4-5 Video
  2. Buat akun Gmail anda, umur harus 1 bulanan dan umur anda harus 18 tahun.
  3. Jika sudah buka Yotube dan Masuk menggunakan akun Google anda, jika sudah upload ke 2 video tersebut, tuliskan judul Video, dan nama deskripsi yang anda inginkan, kalau bisa deskripsi mencapai 150 kata. Biar cepat page one di Youtube.
  4. Jika sudah lakukan pengelolahan Video anda, dan Kemudian Klik link ini untuk melakukan Monetisasi www.youtube.com/account_monetization.
  • Setelah itu kembali ke pengelola Video dan lakukan cehk list pada daftar Video anda, dan klik monetisasi.
  • Nah setelah itu anda kaitkan dengan Video anda tadi ke adsense, caranya Saluran > Monetisasi > terus cari pertanyaan - Bagaimana saya akan dibayar? > Lalu "mengaitkan akun AdSense"
  • Tunggu sebentar dan anda akan dibawa masuk ke Gopogle adsense pendaftaran, lakukan login dengan akun anda.
  • Kemudian anda akan disuruh melakukan pengisian Fomulir pendaftaran, lakukan pengisian dengan benar.
Berikut Keterangannya :Negara atau Wilayah : Pilih Indonesia 
Jenis Akun : pilih perorangan  
Nama penerima pembayaran : sesuai dengan nama anda 
Alamat anda Tinggal : Gunakan tempat anda tinggal. 
Alamat Jalan : alamat jalan anda 
Kota : Kota tempat tinggal anda 
Provinsi : Provinsi Kota anda 
Kode pos : kode pos daerah anda 
Telepon : masukan Nomer telepon andayang terakhir tidak usah di ubah bagian email, lalu klik KIRIM PERMOHONAN


Berikut contoh email masuk jika Permohonan anda diterima :

Cara Mendaftar Akun Google Adsense lewat Youtube cepat diterima